Monday 4 April 2016

Etsy Shop

So big announcement!

I have an addictive personality. I get addicted to something for weeks at a time, and then won't go back to it for months, or even years. It ranges from everything, hobbies, fitness, even food. (I have a 2 musli bars in my cupboard that are 2 years old. Back from when I was bulk buying them and eating 3 every day.)

My latest addiction has been crafty things. And it started with cross stitch. Over christmas, I had more free time on my hands then I was used to. And I rediscovered how much I enjoy cross stitching. I also discovered how much I dislike heaps of the patterns that I found in Michaels. 

My foray into designing patterns was with a family tree for my grandparents. I knew what I wanted it to look like, there wasn't anything that I could buy that would look like it (obviously, what mass produced cross stitch pattern would have my family's names on it). Plus I didn't (and still don't) have the money to buy enough patterns to satisfy my addiction. So I designed my own.

Once I had done this, I got a touch addicted. I had all these idea going around my head. And I wanted to design them! But the logical side of me said that there is no point in designing and sewing a whole lot of designs, with nothing to use them for. 

From that I came up with the idea to make an Etsy store to sell my patterns. At this point its just cross stitch. But in the future (if I get addicted to anything else) it can expand! 

The hope is that it will give me enough money to sustain my craft addictions! 

So without further ado!  I introduce you to my Etsy Store! you can find it here

Use the discount code NEWSHOPDISCOUNT to get 50% off! 
And stay tuned here and on my instagram for more discount codes! 

Thursday 31 March 2016

Clasps/ Rookie mistakes - laptop sleeve

So originally, I wasn't going to do this as its own post. I was going to edit the sewing laptop sleeve (here) and just be all happy that I had finished.

That was until I realised what a rookie mistake I had made.

So picking off from where I left at the end of the last one. I had my "finished" sleeve and I headed off to my friendly- locally owned craft store. (I could've gone to my kinda friendly craft mega store, but those employees aren't quite as invested as the ones in friendly local owned. And given I didn't know what I wanted, I needed someone invested in craft.)


It was suggested that I use a magnetic clasp. Like this!

It ended up being $2.50. Taking my total spent on this sleeve $12.50. Not bad given the ones I was looking at in the shops were $30.


This is where the rookie mistake came in. I went to attach my clasp (my friendly craft supplier said that I just pushed it through the fabric and put the securer on the other side. Easy.) I went to do it. And realised I had sewed up the other side. So I couldn't get into attach it. (Major rookie) 

So I had to cut the side of my hard sewn seam, (I didn't need to go all the way, just enough to get my hand in).
I attached my magnetic clasp (which was surprisingly easy) and then I sewed back up the hole that I cut up.


Next I had to put the clasp on the other side, which was easier because I didn't have to cut up what I had already done. I just had to line it up.


And voila! A (finally) finished laptop sleeve!

Some tips:
  • When you start a project, make sure you know how you're going to finish it. Redoing things is annoying, time consuming, and any other adjective you can think of.
  • Start with the flap. When you are attaching the magnetic clasp, start with the flap bit, then you can line up the bottom with the top. If you start with the bottom, then you end up with a clasp that does nothing. Its a rooking mistake (another one, from experience)
  • Dont be afraid to get advice. Whether its from a store owner, a friend, your mother, or even me! Someone elses opinion helps

Tuesday 29 March 2016

Easter Egg Stress Ball

So as part of Keas, I spend my life looking for cool activities to do. Ones that link into something that they can learn and that we can talk about.

This week, it was Easter. Because it was coming up. And they knew about it. Plus chocolate is exciting. We try to avoid religion, not because we have too (scouts is a Christian organisation, I am of the belief that if you send your kids to a Christian thing then expect Christian stuff). But it's definitely easier not to risk getting complaints. Plus (from a students point of view) parents are quite a bit more protective over 6-8 year olds than the 14 year olds I make do prayers on camp.

Anyway! The activity we did was to create Easter eggs that doubled as stress balls!


You need:

  • Flour
  • Balloons
  • Sharpies/ permanent markers 
  • Funnel (for the flour) 
    • the size doesn't really matter, balloons stretch! 


So it's actually really easy. The idea is to full the balloon with the flour. Tie it up at the top (a same as you would if it was full of air) and then decorate it with the sharpies.

Things we learnt:

  • Blow up the balloon first. They were quite hard to fill up if you didn't blow them up first. But make sure you fully deflate it first 
  • Don't squeeze the bottom! Sounds obvious, but there were at least 3 kids that went home white from getting flour in the face
  • Have enough funnels. We had 8 Keas working on it, and only 4 funnels. I didn't expect it to take nearly as long to fill as it did, so there were a few impatient kids 
  • Don't start playing immediately. We did. Cause we are 6 and they are fun. Mine ended up having none of my drawings on it by the time I got home. And I had a black hand. 


Another way to do it (which we didn't, cause we have no money) is use different colours of balloons. You put the first balloon inside another one of a different colour. Then you cut out holes in the outer balloon.

Friday 18 March 2016

Sewing - Laptop Sleeve

So the other day I wrote about my first experience designing a pattern from scratch (you can find it here!) 
So next step is to share my experiences with the sewing of the laptop sleeve!

So the first step is to cut out my pieces of the pattern. My pattern is made up of 2 pieces, the lid and the sleeve part.

So first up a cut the lid out. I decided that I wanted to line the inside of it, as it would be seen, and the under side of the white fabric isn't very pretty. 
I sewed these together by pinning them with the insides facing together and sewing round 3 of the sides. Turning it inside out (right way round) and sewing the final side.

Then I cut out the  sleeve parts. My original plan was to have a two pocket sleeve, one for my laptop and one for the papers which I need for the meeting(s). So I cut out 3 of my sleeve pattern, with the plan to attach them together at the bottom.  


Unfortunately for me, my sewing machine isn't quite good enough to sew together the three layers of my fabric. So I forgoed the extra pocket, and just went for the plain sleeve. I sewed round 3 of the sides, and made the sleeve. I put my laptop inside it at this point, just to make sure it fitted before I added the lid. 

Next I, really slowly because my sewing machine is not a fan of this fabric, attached the lid to the sleeve to finish it off!


When I went to put my laptop into the sleeve, it was miles to big. So I had to do some alterations. 
I turned it inside out, put my laptop into the sleeve and marked where my seam should go.
Next I sewed it up, and trimmed the excess of the sides. 

When I started the project I hadn't quite figured out what type of connector/ opener that I wanted to use. So my next step is to head off to my friendly neighbourhood craft person to see what they have and what they think. I'll edit this post when I have the chance/money to be able to buy whatever connector and sew it on. 
I know that I want  something that emphasises the angular irregular part and looks pretty. But I don't want something that means the other part flaps around heaps. 

Some tips:
  • Use the remnants bin! My fabric (again) I found in the remnants bin. I spent max $10 NZ on my fabrics. And I have a heap more black fabric to use on other projects (stay tuned!)  
  • Use heavier duty fabrics. The white flower one is an upholstery fabric. The black one I didn't find in the upholstery section (I found it in the remnants bin) but its thicker than all of the fabrics that I used. Because I wasn't adding any padding to my sleeve, it was important that I had a thicker fabric. 
  • Experiment with the pattern. Because I knew what I had in my head, I just played with the pattern and the fabric until I got what I wanted. Point and case, a too big laptop isn't going to help anybody. (especially not my poor laptop and papers). 
  • Foam/padding isn't needed.  I didn't use any padding or foam in my sleeve for a few reasons. 1) I have a case on my laptop, which will protect it from the banging around that life with me entails. 2) I didn't need a sleeve to protect my laptop (I bought a hard cover case)  I needed a sleeve to keep all my papers/life together when I went to meetings. And 3) I am cheap, so I didn't think that I needed to spurge on the foam.
  • BUT add it if you want too. I decided for no padding. But if you want a sleeve that is going to protect your laptop and not just act as a funky accessory to get stuff from A to B. Then add padding.
If you love this sleeve and want to make it yourself, or if you have any questions. Feel free to give me a holla!

Till next time! 
Dat Girl


Monday 14 March 2016

Pattern Making - Laptop Sleeve

So because I'm cheap and crafty (in some cases they are the same thing!) I decided to sew myself up a laptop sleeve. 
I knew that I wanted to have a cool angular part to it, and I wanted it to be big enough to be able to fit papers in with it. Which meant that it had to act as more of a folder/bad type thing then a typical sleeve.

So because I kinda had in my head what I wanted, I figured that I would give pattern making a crack! 
First thing that I did was grab some handy dandy newspaper, and a permanent maker. Good thing with newspaper is it is cheap, and I can cut it up and fold it to make sure that it was going to work!

Next I put my laptop on top of the newspaper and figured out how big sleeve I wanted. Now I am untrusting of my cutting ability and my sewing with small seams ability (both of which come from a relatively new sewer) so I gave myself quite a bit of allowance just to make sure that I didn't screw it up royally. 


Then I cut straight up the line. I knew that my case was going to be that wide, so all that I had to do next was figure out how long it needed to be, and what I wanted the lid to look like. So I folded it up to make it in to what I wanted.

My pretty newspaper sleeve
Next I cut out my "pattern". I decided to cut out 2 of them (just in case I decided I wanted to do a lining.
And now I was ready to use my patterns! This is when I got the biggest learning curve about pattern making. I did way more work than I needed too. 
I only needed to do one pattern ( I definitely didn't need 2). And because I was doing the lid in a different fabric from the rest of the sleeve, it was seriously unhelpful to have it attached to the rest of the pattern. 
So I cut it off. 


I then realised that I didn't need to have a pattern that was for the entire "sleeve" part of it. Especially if I wanted to add a pocket on the outside for more papers or other things, then I really couldn't do it as one continuous piece. 
So I cut it in half. 

So, to summarise the steps for pattern making (something as easy as a laptop sleeve)

Steps:
  1. grab your pattern making material (i.e. newspaper)
  2. figure out the width 
  3. figure out the length/ lid/ any other fancy fabric details 
  4. figure out if you have done too much work, and what you actually want (this step is optional!) 
Till next time, and my completed sleeve! 
Dat girl

Friday 11 March 2016

Cross Stitch Thread Organisation

Let me tell you. I am one of those people who manage to make organisation seem like a mess. Or make a mess seem like organisation...
Either way, its a gift.

So I figure as part of this blog, I shall give everybody I sneak peak into my organisation systems. As they are organised. No holds back, I'll show you the ones that work for me, the ones that don't, and why.

So first up is cross stitch thread.
This stuff is hellish. It gets knotted, I have quite a bit of it (especially given I have only just started to grow my own collection, instead of stealing my mothers.) One of my best friends gave me her collection of threads, some of which have been organised. Some that hadn't been.

The beginning of my organisation process
So first things first, I gave pinterest a solid browse. I found some really good posts about how other people had organised their collections (you can see some of them on my board here).

I decided on using the wooden peg method. It means that I can wrap my thread around them, and put a note on them with their number. Because I inherited a lot of thread, it wasn't all the same brand. There is a combination of DMC, Anchor and other brands (some that I don't even know, they just had a number written on the card). So I have colour coded my numbers, pink for DMC, blue for Anchor, and green for everything else.

I then put them into a plastic box. the ones in the long panels on either side are Anchor and other brands. While the middle sections are DMC, divided into numbers by the 100.


Every time I start a new cross stitch project, I pick out the threads that I need from my box and put them into my cross stitch project bag, along with my needles, cloth and thread scissors.

Once I've finished the project, the threads go back into the box (DMC 360, black thread, normally just stays in my project bag, as I use it in some form in all of my cross stitches).

Next step is to buy another container for all my duplicate threads!

Pros and cons:
  • The wooden pegs are a lot cheaper than the fancy cross stitch thread organisation thingys. I picked up 100 for $3 NZ. Because of how cheap they are, I don't feel bad writing all over them 
  • I can see the thread a lot easier, I'm not entirely sure why that is, probably because they are  wound closer together than you can do on the fancy ones 
  • I find them easier to get the thread off then on the fancy ones. That might just be because I am useless, but I just have the end pinched so I know exactly where I am starting from 
  • But I can't fit as many of the pegs into my container as I could if I used the fancy cross stitch thread 
  • A few times my thread has got caught on the wood. Probably because I bought cheap pegs, so there are a few splinters and things in them. Its still annoying to have to be that careful.
I hope this helps you make decisions on your mess techniques!

Till next time!
Dat girl


Monday 7 March 2016

For Fox Sake

So recently I have rediscovered cross stitch. By rediscovered when I originally discovered it, it was not really very good. Everything was a mess, I don't think I finished, and they weren't actually very cool patterns. They were cool for 10 year olds. But I'm sure there is a reason that I lost them, never finished them, and they have yet to be seen again.

I'm starting to really enjoy cross stitch, the stuff that you can make is amazing! It truly is incredible what a bunch of little squares in different colours put together can make.

So my first project was a little christmas ornament for myself (which I'll show you another day, it is currently stored with my other christmas decorations, and there are a ton of them).

But my second project was a funny one that I stumbled across on pinterest. It was hilarious, every time I think of it it makes me snigger.

I couldn't find a pattern for the one that I found on pinterest, so based on the picture of the cross stitch I found, I made my own pattern!

And I think that it turned out pretty good! My Aunt, who I gave it to, is pretty pleased with it. Which is always great.


Now, because I am a truly generous person, I have decided to give away my pattern! So if you think that this is as fab as I do feel free to download the pattern below!

For Fox Sake - Cross Stitch Pattern
Some tips!
  • Be creative!  there are lots of ones like these online all over the place. If you decide that you want your fox to be in the trees, then add trees! If you want them to be in the grass, then add grass! the sky is the limit! (well, I'm sure you could do a space fox if you wanted too...)
  • Don't get to stuck in the colours. There are thousands of different DMC threads to chose from, if you have orange, brown and white on hand that you like together, than use those! Or use any other colours that you think look good together. Its up to you! 
  • Don't freak out if you lose count. Its not the end of the world. Worst case scenario is you fox is slightly skinner or fatter! 

Till next time! 
Dat Girl

Sunday 6 March 2016

Card trading game

So as part of my crazy life, I run a thing called Keas. To put it simply, this is the youngest level of scouts in NZ, we range from 6- 8 years old, and my group we keep at about 8 of them. They are also called Beavers, Cubs, Joeys, amongst other names which you can find here (thanks wikipedia!)

So as part of this blog, I figured I would share some of the stuff that we do at Keas. We play a range of games, and do a range of crafts. Given that there is normally at least 2 keas to one adult, more like 3 to one, most of the activities are "relatively"easy. We chose activities that we hope they can do with little adult assistance. So they are sometimes shown online as being for pre-school aged, or taking less time than it takes us to do it.


So as a first post, I thought I would talk about a game that we played for the first time last week. Its called the card trading game. All it requires is an outside area to play in, and a pack of cards
The general rules are there are 2 teams, both of which have a home base, where they leave their cards. And each team begin with a different colour of card (one red, one black). The aim of the game is for them to trade their cards with the other team. Its made more complicated as they can only take one card with them at a time. AND there are taggers. The taggers (which for us began with being the leaders), can tag people of either team, but once they get tagged they have to give over the card that is in their hand.

The good thing is this can be played with any number of people (the number in the teams and as taggers can change), and in any size area. With older kids, we play it in a huge area, with lots of places to hide and lots of different routes. It makes it harder to find someone to trade with, but also harder for the taggers to find you.

When we did it with our keas, we did it in a small area (about half the size of a tennis court). Each team had a base, and because we were doing it in such a small area, we also added in a trading area. The taggers couldn't tag you if you were in the tagging area, or if you were at your base.

The game was a massive success! We spent the whole hour playing the game, as they totally fell in love with it! It's definitely a game that I would play again with them.


Till next time,
Dat Girl 

Tuesday 1 March 2016

DIY Lace Vest

So I went shopping the other day to a fabric store (I had to buy some fabric for a laptop case and some birthday presents that I'm planning on making), and while I was there I found the coolest lace in the remnants bin.  In my usual fabric shop, the remnants bin is full of amazing finds, I know this isn't always the case, sometimes the bits in their are obviously off cuts from a product that someone has bought and their is hardly enough to make a sock. But I still think that they are worth a look! I have found some great small off cuts in those bins that I am planning on using as coloured accents on bags and shirts and skirts and all the other fun stuff I plan on making.

So this is the $5 lace I bought! There is a heap of it! which is exciting.

 my fabric 
So with the lace, I decided I wanted to make a vest/ shawl thingy that I can wear over the top of outfits. I already have a black one, and I figured that I could try and use it as a pattern to make a new one!
 my purchased one 

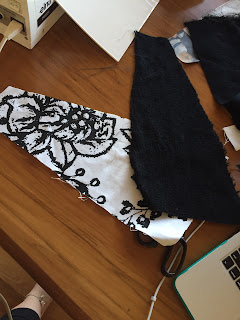
So I laid out the black one first, just to see what I was working with. I then put my lace down on the bottom, and put the middle panel of the black one on top.
 laid out on the table

Next I cut around the outside of half of the black one, moved the black one away, folded my lace in half and cut out the remaining half using my lace as the pattern (this way I knew they were exactly the same).
my back piece!

Next I took the same approach to do the front. Laid out my lace, put one of the front piece on top, and cut it out. What I did differently is I didn't cut out the arm dip part. I laid my piece on top of my back panel so that my arms would be the same. This part didn't exactly go to plan.

As you can see, I lined up my bottom but my top part was a bit off... as in it was no way near connecting to the shoulder part. So I went to plan B.

Plan B was cutting out the same width as I started with or Plan A, but instead of the fancy curve that you can see in the picture above, I just cut straight up the line. Next I pinned my 2 panels (for the front of my vest) to my back piece, and cut it to line up with the side. This meant that I know that my pieces will fit together as perfectly as my cutting skills allow.

Next I had to pic a thread that matched, well I attempted too. It was like "the dress" all over again.
Because I am cheap, I didn't buy any thread to match in the shop I just chose from what I had at home.

Once I had picked my thread, I did a quick google search, as I wasn't overly confident with sewing lace (as in I had never sewn it before), check out my pinterest board for tips!  I ended up using a zig zag stitch to sew my edges. Once I sewn it up, I tried it on, trimmed threads and shaped the front panels to make them look not like straight lines (which I literally did with scissors in front of a mirror).

And I ended up with this! 
Personally I think its cool! I might, at a later date add sleeves, to make it more versatile (there are certain places like my work where I need to have my shoulder covered). I am also thinking about putting bias tape over all the edges (bias tape is a strip of fabric that you can use to cover edges to give them a line). 

So some tips! 
  • If you are going to splurge on lace, definitely get thread to match. If I add sleeves to this, and particularly bias tape, my seams are going to stand out because I was too cheap to buy thread. 
  • Use your off cuts to practice sewing on the fabric, and working out which stitch works best for the fabric you have. It happens that for me zig zag worked fine. But if you gaps are bigger than maybe that won't work for you. 
  • Watch out for your feet and the holes in the lace. When I first read this I scoffed. Then (in my practice piece) I got it stuck. 
  • Don't be freaked out! I'm a relatively novice sewer, this was my first time sewing on lace and I whipped it up in less than a spotify playlist, including technical difficulties (not sure how long it took me, I just know I didn't listen to a song more than once!)  

If you want a pattern, or better instructions, than holla at me in the comments. I'd love to here what you think of this! So comment at me! 

Till next time! 
Dat Girl


Monday 15 February 2016

Planning my life

So an important part of life is knowing what you are doing. So I have spent countless hours in the last few weeks attempting to sort out my life for the next year. Between university, work, birthdays and all my other activities life is crazy. Cray cray you could say. 

So I took myself out to Typo (an Australia and New Zealand awesome stationary store), and bought myself a diary. 

Writing in all your commitments is overrated so I took to my diary with a crafty eye and did my darndest to make it look cooler, and to have a more me diary. And one that looks far cooler. 

So here's a sneak peak at my diary! 


What I used:
  • a weekly planner, mine was from Typo  
  • ink joy pens, these are my life and my favourite pens in the WORLD. It started of with the 4 "normal" colours, but once I found the extent of colours that they have, I was hooked. And never gone back. I have bought at least 4 sets of them, everytime I pop over to the states (like the jetstetter I am lol!) I pick up a massive pack of pens. Last time I picked up a pack of ink joy felt tip pens and I am in love with these as well! (I swear I am getting no money from this!)
If you have any questions about anything, feel free to comment and holla at me 
Till next time!
Dat Girl

Raining crayon art

So given I have only just started this blog, there are going to be a long(ish) list of crafty things that I have done already. So I’m going to start trying to catch up on them. And I’ll probably through some new ones in too!

So 4 years ago, I decided to paint room. I went for the moody grey with a black feature wall. But given that I’m not actually moody enough to consistently require a black and grey room, it was always the plan to lighten it up with a piece of artwork. Unfortunately for me I’m a student. Student = broke. So I decided to get my craft on, browse pinterest and DIY it.

I stumbled across crayon art, the one that did the rounds about 4 years ago. Where you melt down crayons to create a picture, I did that.

It started off wellish. I had read on one of the many sites that tell you how to do it that the easiest way is to use a hot glue gun. I didn’t want to ruin the hot glue gun that I already had, so I took myself of to the shop to buy another cheap one.

I get myself all sorted, a canvas painted black (to match my moody wall and I thought that the black would make the coloured crayons pop), a rainbow of crayons, and my hot glue gun. Then horror struck, my crayons didn’t fit into the glue gun. So the rain affect that I was going for was not going to work by just running it down the side. So I tried taping it to the top and getting the hair dryer on it. That also didn’t work (though I have no idea why).

So eventually I just put the crayons on the hot end of the glue stick until it had melted a bit, and then dropped it onto the canvas where I wanted it.

I’m quite proud of the final result!


If you are wanting to do something like this yourself (which I’m sure you will manage to do much easier than I did!) here are my tips:
  •  Go in with an idea of what you want to do. I wanted to do a story of someone playing in the rain (hence the blue/ grey, and the coloured one). It was based on the quote “life isn’t about waiting for the storm to pass, its about learning to dance in the rain” cause that was the phase I was in when I made it. But I still love it now
  •  Find a hot glue gun that fits your crayons. I bought one of the thin glue ones which didn’t fit my Crayola crayons. If you want to splurge on the big one than I’m sure your life will be so much easier
  • Splurge on a glue gun. You will almost certainly ruin the one you use. So whether you want to use the one that you already have, or buy a new one specially for this project, you will need 2. Unless you like to have pretty coloured crayons all over your future projects, but that’s really your call
  •  Paint everything else after the crayons. It may sound obvious, but it wasn’t to me. I was so excited to see my art come together that I painted that white bits first. Then I sploted melted crayon all over my white parts. Good news though! The paint covers the crayon really easily. I just put the tip of the hot glue gun on the bits that were in the area I was painting over (to flatten them), then a coat of white paint covered it completely
  •  Have fun! Clichés are always fun, but in the case of crafty things, this one is always important. You can always buy a piece of art to go on your wall, so there really is no reason to stress! Worse case scenario you can do the good ol’ fashioned paint splash.  


Till next time! And my next project!

Dat girl