So the other day I wrote about my first experience designing a pattern from scratch (you can find it here!)
So next step is to share my experiences with the sewing of the laptop sleeve!
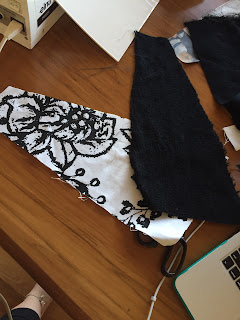
So the first step is to cut out my pieces of the pattern. My pattern is made up of 2 pieces, the lid and the sleeve part.
So first up a cut the lid out. I decided that I wanted to line the inside of it, as it would be seen, and the under side of the white fabric isn't very pretty.
I sewed these together by pinning them with the insides facing together and sewing round 3 of the sides. Turning it inside out (right way round) and sewing the final side.
Then I cut out the sleeve parts. My original plan was to have a two pocket sleeve, one for my laptop and one for the papers which I need for the meeting(s). So I cut out 3 of my sleeve pattern, with the plan to attach them together at the bottom.
Unfortunately for me, my sewing machine isn't quite good enough to sew together the three layers of my fabric. So I forgoed the extra pocket, and just went for the plain sleeve. I sewed round 3 of the sides, and made the sleeve. I put my laptop inside it at this point, just to make sure it fitted before I added the lid.
Next I, really slowly because my sewing machine is not a fan of this fabric, attached the lid to the sleeve to finish it off!
When I went to put my laptop into the sleeve, it was miles to big. So I had to do some alterations.
I turned it inside out, put my laptop into the sleeve and marked where my seam should go.
Next I sewed it up, and trimmed the excess of the sides.
When I started the project I hadn't quite figured out what type of connector/ opener that I wanted to use. So my next step is to head off to my friendly neighbourhood craft person to see what they have and what they think. I'll edit this post when I have the chance/money to be able to buy whatever connector and sew it on.
I know that I want something that emphasises the angular irregular part and looks pretty. But I don't want something that means the other part flaps around heaps.
Some tips:
- Use the remnants bin! My fabric (again) I found in the remnants bin. I spent max $10 NZ on my fabrics. And I have a heap more black fabric to use on other projects (stay tuned!)
- Use heavier duty fabrics. The white flower one is an upholstery fabric. The black one I didn't find in the upholstery section (I found it in the remnants bin) but its thicker than all of the fabrics that I used. Because I wasn't adding any padding to my sleeve, it was important that I had a thicker fabric.
- Experiment with the pattern. Because I knew what I had in my head, I just played with the pattern and the fabric until I got what I wanted. Point and case, a too big laptop isn't going to help anybody. (especially not my poor laptop and papers).
- Foam/padding isn't needed. I didn't use any padding or foam in my sleeve for a few reasons. 1) I have a case on my laptop, which will protect it from the banging around that life with me entails. 2) I didn't need a sleeve to protect my laptop (I bought a hard cover case) I needed a sleeve to keep all my papers/life together when I went to meetings. And 3) I am cheap, so I didn't think that I needed to spurge on the foam.
- BUT add it if you want too. I decided for no padding. But if you want a sleeve that is going to protect your laptop and not just act as a funky accessory to get stuff from A to B. Then add padding.
Till next time!
Dat Girl


No comments:
Post a Comment